新着情報
2-3. Web動画像のGUI処理システム(tkWebCapLabelMenu.py)
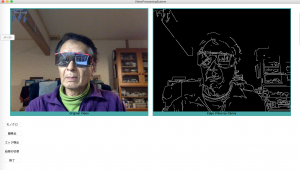
Fig.1 GUIボタン付き動画処理システムのサンプルプログラム
Webカメラが継続的に撮影するモニター動画像をリアルタイムでGUI処理する場合、異なる処理をどう切り替えるかが問題となる。静止画像処理では、処理毎に対応する関数を定義し、関数内で処理済み画像をLabel widgetに貼り付け、Label.pack()で表示を更新すれば切り替えは完了し、問題は生じない。即ち、異なる処理の切り替えは異なる関数と紐付けされたボタンwidgetの選択で解決できた。しかし、動画像ではweb映像の切り替えは関数の選択だけではうまく行かない。動画では映像の表示が連続的に続いており、これを一旦停止せずに次の処理に移るとエラーとなって停止してしまう。異なる動画処理を実行するには、まず瞬間映像の表示を一旦ストップし、Label widgetに対し、winfo_children()を使用してそのwidgetに紐づけられたwidgetリストをクリアする必要がある。その後、異なる処理関数を選択してLabel widgetリストを再定義することで異なる動画像処理がうまく実行可能となる。
下記のサンプル・プログラムは6個の異なるGUI処理メニューを持つWeb動画像システムを実現している。即ち、
1) def show_gray(): Webカメラが撮るモニター映像と白黒濃淡映像の表示、
2) def show_face(): Webカメラが撮るモニター映像と顔と目の検出映像の表示、
3) def edge_canny(): Webカメラが撮るモニター映像とCanny法によるエッジ映像の表示、
4) def switch(): global 変数showの値を0と1に切り替える。
5) def destroy_child(): showの値を調べ、showの値が1の時、ラベルlaとlbに紐付けされたwidgetリストを破棄する。
6) def finish(): メッセージボックスによるプログラムの終了を確認した後、プログラムの終了とweb映像撮影を終了。
上記を例に用いて、動画における異なる処理の切り替えを実現する仕組みを説明する。
まず、全体の定義文において、行24においてglobal変数showの値を1に設定する。
#!/usr/bin/env python3
# -*- coding: utf-8 -*-
"""
Created on Sat Mar 30 16:40:02 2019

@author: PBK-****
"""

import tkinter as tk
from tkinter import *
from tkinter import filedialog
import sys, os.path
import cv2
from PIL import Image, ImageTk
global imgtk1,imgtk2
global size,show,image1,image2
size=400,400


cap = cv2.VideoCapture(0)# 内臓Webカメラの場合:0
cap.set(cv2.CAP_PROP_FRAME_WIDTH, 300)
cap.set(cv2.CAP_PROP_FRAME_HEIGHT,300)

show = 1 # global変数showの初期設定

root = Tk()

root.geometry('2000x800')

lframe = Label(root)
lframe.pack()
そして、show_gray()関数の末尾に、行76から行81のif文を追加する。もし、global変数showの値が1なら、lframe.pack()によりlframe の子widgetである laにWebが撮影する瞬間画像を、別の子widgetである lbにその処理画像をそれぞれ表示させ、10ミリ秒毎にshow_gray関数を呼びだす処理を繰り返す。もし、showの値が0なら、この繰り返し処理をストップして、showの値を1に設定し、la 及びlb widgetに紐付けされたwidgetリストを破棄するdestroy_child()関数を呼ぶ。
 if show:
      lframe.pack()
      lframe.after(10, show_gray)
 else:
      show=1
      destroy_child()
同様な処理を別の処理関数でも行うために、show_face()関数の末尾に、行122から行127のif文を追加し、
        if show:
            lframe.pack()
            root.after(10, show_face)
        else:
            show =1
            destroy_child()
また、edge_canny()関数の末尾にも行152から行158のif文を追加する必要がある。
        if show:
            lframe.pack()
            root.after(10, show_face)
        else:
            show =1
            destroy_child()
現在選択している処理関数から別の処理関数へ移る場合は、その前にswitch()関数を一度クリックしてshowの値を0にする必要がある。switch()関数はクリックによって呼び出される度にshowの値を0から1に、又は1から0に反転させる。
destroy_child()関数では右側に配置されるlframeの子 widgetであるlaと、左側に配置される子widgetであるlbに紐付けされたwidgetリストを破棄する。
switch()関数とdestroy_child()関数は以下の様に定義すれば良い。
# 処理切り替えの為のスイッチ
def switch():
      global size,show
      if show:
            show = 0
      else:
            show = 1
# widget list の破棄
def destroy_child():
      global size,show
      children1 = la.winfo_children()
      for child in children1:
           child.destroy()
      children2 = lb.winfo_children()
      for child in children2:
           child.destroy()
以下にサンプル・プログラムの全体を示す。
#!/usr/bin/env python3
# -*- coding: utf-8 -*-
"""
Created on Sat Mar 30 16:40:02 2019

@author: PBK-****
"""

import tkinter as tk
from tkinter import *
from tkinter import filedialog
import sys, os.path
import cv2
from PIL import Image, ImageTk
global imgtk1,imgtk2
global size,show,image1,image2
size=400,400


cap = cv2.VideoCapture(0)

cap.set(cv2.CAP_PROP_FRAME_WIDTH, 300)
cap.set(cv2.CAP_PROP_FRAME_HEIGHT,300)
show = 1

root = Tk()

root.geometry('2000x800')

lframe = Label(root)
lframe.pack()

root.title('VideoProcessingSystem')
root.bind('<Escape>', lambda x: root.destroy())

image1 = PhotoImage()
image2 = PhotoImage()

#face_cascade_path = './haarcascades/haarcascade_frontalface_default.xml'
face_cascade_path = './haarcascades/haarcascade_frontalface_alt2.xml'
eye_cascade_path = './haarcascades/haarcascade_eye.xml'

face_cascade = cv2.CascadeClassifier(face_cascade_path)
eye_cascade = cv2.CascadeClassifier(eye_cascade_path)

la = tk.Label(lframe,text='Monitor Video',image=image1,bg='#44aaaa',width=600,height=500)
lb = tk.Label(lframe,text='Processed Video',image=image2,bg='#44aaaa',width=600,height=500)
la.pack(side=LEFT,padx=10, pady=20)
lb.pack(side=LEFT,padx=10, pady=20)
lframe.pack()

def show_gray():
        global size,show
        global imgtk1,imgtk2

        _, frame = cap.read()
#        cap.set(cv2.CAP_PROP_FRAME_WIDTH, 300)
#        cap.set(cv2.CAP_PROP_FRAME_HEIGHT,300)

        frameg = cv2.flip(frame, 1)
        image = cv2.cvtColor(frame, cv2.COLOR_BGR2RGBA)
        img = Image.fromarray(image)
        imgtk1=ImageTk.PhotoImage(img)
        imageg = cv2.cvtColor(frameg, cv2.COLOR_BGR2GRAY)
        img2 = Image.fromarray(imageg)
        imgtk2=ImageTk.PhotoImage(img2)
        la.config(lframe,image=imgtk1,bg='#44aaaa',width=300,height=300,text='Original Video',compound='top')
        la.image=imgtk1
#        la.grid(row=0,column=0,padx=5,pady=5)
        lb.config(lframe,image=imgtk2,bg='#44aaaa',width=300,height=300,text='Gray Image Video',compound='top')
        lb.image=imgtk2
        la.pack(side=LEFT,padx=10, pady=20)
        lb.pack(side=LEFT,padx=10, pady=20)
#        lb.grid(row=0,column=1,padx=5,pady=5)

        if show:
            lframe.pack()
            lframe.after(10, show_gray)

        else:
            show=1
            destroy_child()

def show_face():
        global size,show
        global imgtk1,imgtk2

        _, framef = cap.read()

        src = cv2.cvtColor(framef, cv2.COLOR_BGR2RGBA)
        img = Image.fromarray(src)
        imgtk1=ImageTk.PhotoImage(img)

        la.config(lframe,image=imgtk1,bg='#44aaaa',width=300,height=300,text='Original Video',compound='top')
#        la.grid(row=0,column=0,padx=5,pady=5)
        #frame2 = cv2.flip(frame, 1)

        src_gray = cv2.cvtColor(src, cv2.COLOR_BGR2GRAY)
        faces = face_cascade.detectMultiScale(src_gray,1.1,3)

        for x, y, w, h in faces:
            cv2.rectangle(src, (x, y), (x + w, y + h), (255, 255, 255), 2)
            face = src[y: y + h, x: x + w]
            face_gray = src_gray[y: y + h, x: x + w]
            eyes = eye_cascade.detectMultiScale(face_gray)
            for (ex, ey, ew, eh) in eyes:
                cv2.rectangle(face, (ex, ey), (ex + ew, ey + eh), (0, 255, 0), 2)

        cv2.imwrite('face-eye_detected.jpg', src)
        im2 = Image.open('face-eye_detected.jpg')

        im2.thumbnail(size,Image.ANTIALIAS)
        img2 = Image.fromarray(src)

        imgtk2=ImageTk.PhotoImage(img2)


        lb.config(lframe,image=imgtk2,width=300,height=300,text='Processed Video',compound='top')
#        lb.grid(row=0,column=1,padx=5,pady=5)
        la.pack(side=LEFT,padx=10, pady=20)
        lb.pack(side=LEFT,padx=10, pady=20)
        if show:
            lframe.pack()
            root.after(10, show_face)
        else:
            show =1
            destroy_child()

def edge_canny():
        global size,show
        global imgtk1,imgtk2

        _, frame = cap.read()

        rgb = cv2.cvtColor(frame, cv2.COLOR_BGR2RGBA)
        img = Image.fromarray(rgb)
        imgtk1=ImageTk.PhotoImage(img)
        gray = cv2.cvtColor(frame, cv2.COLOR_BGR2GRAY)
        edge = cv2.Canny(gray,100,200)
#        imgp = cv2.add(gray,edge)
        img2 = Image.fromarray(edge)
        imgtk2=ImageTk.PhotoImage(img2)
        la.config(lframe,image=imgtk1,bg='#44aaaa',width=300,height=300,text='Original Video',compound='top')
        la.image=imgtk1
#        la.grid(row=0,column=0,padx=5,pady=5)
        lb.config(lframe,image=imgtk2,bg='#44aaaa',width=300,height=300,text='Edge Video by Canny',compound='top')
        lb.image=imgtk2
        la.pack(side=LEFT,padx=10, pady=20)
        lb.pack(side=LEFT,padx=10, pady=20)
#        lb.grid(row=0,column=1,padx=5,pady=5)

        if show:
            lframe.pack()
            lframe.after(10, edge_canny)

        else:
            show=1
            destroy_child()


# 処理切り替えの為のスイッチ
def switch():
    global size,show
    if show:

        show = 0
    else:

        show = 1

# laとlbのwidget list の破棄
def destroy_child():
    global size,show
    children1 = la.winfo_children()
    for child in children1:
        child.destroy()
    children2 = lb.winfo_children()
    for child in children2:
        child.destroy()

# 確認メッセージボックスの表示とOKの場合、プログラム全体の終了とVideoCaptureの解放
def finish():
    if messagebox.askokcancel('Confirm Close', 'Are you sure you want to close?'):
        root.quit()
        exit()
        cap.release

# Button メニュー
b1 = Button(root,text='モノクロ',command=show_gray,width=10).pack(side=TOP,padx=10, pady=10,anchor=W)
b2 = Button(root,text='顔検出',command=show_face,width=10).pack(side=TOP,padx=10, pady=10,anchor=W)
b3 = Button(root,text='エッジ検出',command=edge_canny,width=10).pack(side=TOP,padx=10, pady=10,anchor=W)
b4 = Button(root,text='処理の切替',command=switch,width=10).pack(side=TOP,padx=10, pady=10,anchor=W)
b4 = Button(root,text='終了',command=finish,width=10).pack(side=TOP,padx=10, pady=10,anchor=W)

# Fileメニューの選択項目
m0 = Menu(root);
root.config(menu = m0);

m1 = Menu(m0, tearoff = 0)
m1.add_command(label = 'モノクロ', under = 0, command = show_gray)
m1.add_command(label = '顔と目の検出', under = 0, command = show_face)
m1.add_command(label = 'Cannyのエッジ検出', under = 0, command = edge_canny)
m1.add_separator
m1.add_command(label = '処理の切替', under = 0, command = switch)
m1.add_command(label = '終了', under = 0, command = finish)
m0.add_cascade(label = 'File', under = 0, menu = m1 )

root.mainloop()
cap.release()
参考文献:
【Python GUI tkinterサンプル】Frameに追加されている子Widgetを取得し削除する
URL: https://suzutaka-programming.com/tkinter-ttk-frame-winfochildren/